Showing posts with label DIY. Show all posts

Sunday, April 8, 2012

Free DIY Kit! Jewelry Making Fun :)

Hello everyone!  I have bounced back from when you last heard from me and am my bubbly self again.  I will probably right away it later but what I thought had gone wrong is all better now and my tears/belly aches were misspent.  It has all worked out but to make a long story short I thought I wasn’t going to be able to do my Honor Flight Etsy shop but it turns out that I can and I was really worked up about something that turned out to be fine.  :)

Moving on to what I wanted to talk about….

I have been planning on making & selling DIY polystyrene necklace kits on Etsy for a long time now.  I have sold some to several friends but just have not had the time to sell the kits on Etsy yet.   I have also had a lot of requests on how to make my water color wash pendants and the process that I use to make them is literally one that has taken me years to perfect AND it is a long process.  I use a variety of heating/cooling tools when layering the paints and I use a belt sander a handful of times to texture the polystyrene in a way that it picks up the water color paint and maintains that unique look that you can only get with water colors.   It would be pretty much impossible for me to teach anyone how to do that as a DIY project however I can complete the watercolor wash part of it and then sell that.  Finishing the pendant after that point really requires no artist ability or knowledge….it is just a great DIY craft.   I am putting together 3 or 4 kits and will give them out for free just to get some feedback on the product before actually selling it to buyers on Etsy.  Anyone who is interested in making a few water color wash pendants, I’m giving away a few away so email me.  If you just pay the couple of dollars for shipping, I will send a pack out to you for free.  It will include all the instructions that you would need and it will surprise you with just how simple it is when the background is painted for you. 


SoooO yeah email me if you want one!  It will be first come, first serve.  And the kit has ever thing you need in it to make several pendants that you can put on chains and sell on your own Etsy shop!  Yey :) My email is JesseAnneDesigns@gmail.com


Sunday, March 25, 2012

Save Money On Etsy Packing Supplies...(Thanks Mom For the Idea...)

Hi!  I was chatting with my mom a while back about ways to package my Etsy items without spending too much, while still keeping it cute.  She came up with the idea to use paper lunch bags and make them pretty.  You can get about 100 bags for $1 in most places, which costs much less per unit compared to organza bags or boxes. 


All you need besides the paper bags is a pair of pinking shears and a sticker.   The first thing step is to figure out how big you want your bag and cut at that point, fold over and seal with a sticker.  How easy is that?  Paper lunch bags also take well to rubber stamps :)  Hope you all enjoy!


I really do have the best Mom ever :)

Monday, January 16, 2012

Get It Together! (My New Year's Resolution)

My New Year’s Resolution was not to hit to gym more often or quit drinking soda; instead what I really need is to get organized.  I have my art stuff all over the place and I really need to start up a system that is not only easy to look at but is also easy to use.  I had a set up that worked for me before Etsy but now that I am working on a business and I have a studio to set up, I need to get it together.  I was browsing through Etsy this weekend and these are my favorite finds for  organizing your life.    
A desktop organizer from one of the best Etsy vintage shops around.


A "zen" pencil/jewelry desktop organizer from Ireland.


Beautiful clipboard for writing down all your daily plans!  Can you believe this is handmade? And only $14?


Hang it up for $2.80 a set.  From one of my favorite Etsy sellers! (where I get all my beautiful earring tags)


This is what I meant about easy to use and easy to *look* at.


I do love my fellow Michigan sellers <3


All the way from down under, these fabric organizers are pretty and useful.


Lovely color on this large storage bin.


I can see my paintbrushes in this.  And they are happy.

Sunday, January 15, 2012

Valentine's Day Soaps

Heart Shaped Valentine's Day Soaps.


Stamped soaps, inspired by candy conversation hearts, are great gifts for friends. Put in cellophane bags tied with tags; adorn with glitter.

Tools and Materials Nonstick 9-inch square pan
Heart-shape cookie cutter
Glass measuring cup
Glycerin soap
Bench scraper
Soap colorant or food coloring
Spray bottle filled with rubbing alcohol
Cutting board
Needlenose pliers
1/8-inch metal letter stamps
Masking tape


Heart-Shaped Soap How-To We used a 2-inch cookie cutter (1 inch high) and 2 1/2 pounds of glycerin soap-sold at crafts stores-to make 16 hearts.
1. Depending on your equipment, yields may vary. To determine how much glycerin you'll need, fill pan with water to 1/4 inch below height of cookie cutter; pour water into measuring cup. Record amount; discard water.
2. Cut soap into small pieces with bench scraper; fill measuring cup. Microwave on medium heat until melted; stir. Add soap and heat until you've reached the water amount. Add colorant; stir. Pour liquid into pan. Spray with alcohol to eliminate bubbles.
3. Let harden at room temperature, 2 hours. Freeze 10 minutes.
4. Turn upside down onto cutting board. Create soaps with cookie cutter; pull cutter out with pliers if it sticks. Tape stamps together to form words, and imprint on soap, applying light, even pressure.


For more holiday ideas, visit marthastewartliving.com

Saturday, January 14, 2012

Valentine's Day DIY

Some of my favorite DIY Valentine's Day Projects.


Heart Garland
String a heart garland on a headboard or mantle. To create the garland, cut similarly sized hearts from decorative paper. Cut another set slightly smaller than the first. Glue each small heart on top of a large heart. With a hole punch, punch a hole on either side of each heart. Thread string through the holes in the hearts.


Romantic Flowers
Give a discount frame a makeover by accenting its features with pretty paper. Make a template using scrap paper, trace the template on floral-pattern paper, cut out, and attach using spray adhesive. Glue strips of red paper over the floral-paper edges


"I Love You" Library Card & Journal
Make your sweetheart feel special on Valentine's Day by giving them a unique card describing 10 reasons why you love them. Tuck a handwritten library card ( template is available, below) inside a library card pocket (found at school supply stores), stamp the pocket with a pretty image, and attach it to a nice journal to complete the gift.
·     Get the library card pattern.

  For more ideas, head over to betterhomesandgardens.com


Yummy Party Drinks

I found some festive party drink ideas over at Real Simple and thought I would share them with you.  The Pear Mimosas are very tasty though I have not tried these all myself but when I do, I will let you know how they turn out...but they look too good to go wrong.  Also the Pear Mimosas can be made with ginger ale for those of you that are too young to drink  <3

Lime Sorbert Margaritas:

Ingredients

  • 1 lime cut into 8 pieces
  • 1/4 cup sugar
  • 2 pints lime sorbet
  • 1/2 cup tequila

Directions

  1. Rub the lime wedges around the rims of 8 stemmed glasses. Place the sugar on a small plate. Turn each glass upside down and dip the rims in the sugar to coat.
  2. Place 2 scoops of sorbet in each glass and pour 1 tablespoon of tequila over the top of each. Serve with a spoon.


Bouron and Blood Orange Blast:

Ingredients

  • 1 1/2 ounces boubon
  • 1/2 cup blood orange juice
  • 8 fresh mint leaves, plus a sprig of mint  for garnish
Directions
  1. In a shaker, mix together the bourbon, blood orange juice, and mint leaves. Serve over ice in a low glass and garnish with a sprig of mint.

Pear Mimosas:

Ingredients

  • 2 bottles Champagne (or ginger ale), chilled
  • 4 cups pear nectar
  • 1 lime, cut into 8 wedges
Directions
  1. For each serving, pour 3/4 cup of Champagne (or ginger ale) into a flute or wineglass and top with 1/2 cup of pear nectar. Squeeze and drop in 1 wedge of lime.
For more ideas, head over to realsimple.com

Friday, January 13, 2012

DIY Share - Felt Gift Envelopes

DIY Pass Along:  Felt Gift Envelopes:


Hello everyone!  I found a how to guide (from Martha of course) for making these cute felt gift envelopes and I just had to share it with you.  I normally suggest using 100% wool felt in most projects but really any kind of felt is well suited to work with this craft. 


Felt Envelopes & Pockets

Compact discs, blank books, pencils, or diaries are ideal items to offer in these attractive pockets that can be saved and used as protective coverings. Use odd bits of ribbon (wide grosgrain works well) or felt for these gift wraps. If using ribbon, determine the amount needed by the size of the gift (allow about twice the length of the gift).

Tools and Materials:Wide grosgrain ribbon
Felt
Thread
Scissors
Gifts
Note cards

How-To1. Sew a line of stitches on ribbon ends to avoid fraying, and then sew ribbon into desired pocket size.
2. Insert present, and close with velvet or gauze ribbon. If using felt to make the wrap, sew two pieces together into the shape of a pocket, then make scalloped edges with pinking shears.
3. Tie with a bow, and attach a personalized note.

Thursday, January 12, 2012

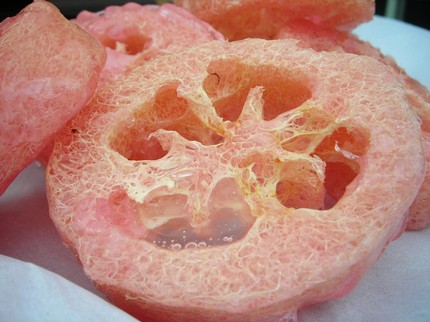
DIY Loofah Soaps.

I love loofah soaps and my favorite ones are from Basin, a bath and body shop at Downtown Disney.


But since the shop is in central Florida and I am in Michigan, I decided it was about time for me to cook up some of my own.  I found this recipe over at Martha Stewart Crafts and am so happy with how my soaps turned out.  Saves a lot of money too!  The ones at Basin are around $6-$7 a piece and by doing it myself, I got 5 soaps for less than $10.  I got my loofah over at the dollar store, they are $4.00 at Target, so that helped keep the price down. 


Want to try it for yourself? 

Tools and Materials:
Knife
Loofah
Waxed paper
Tart tin
Ready-melt soap (such as honey-glycerin and honey-oil mixtures)
Double boiler (or microwave)

Loofah Soap How-To

1. Cut a half slice of loofah using a bread knife.

2. Place slice in tart tin with cups lined with waxed paper.

3. Place brick of ready-melt soap in the top of a double boiler. You can also melt the soap in a microwave.

4. Pour enough soap into tart tin until loofah slice is just covered.

5. Wait about 30 minutes for soap to completely harden before popping it out from tin.